Good news for WordPress users! A new partnership with Google now grants access to all Google Workspace functionalities.
Google Workspace offers excellent features for easy collaboration and document sharing, previously known as G Suite. Some systems may still use G Suite instead of Google Workspace, so don’t be confused by the interchangeable use of these terms. Before G Suite, it was known as Google Apps For Work.
Branded email domains from Gmail clients enhance organization control and security, preventing employees from using personal Gmail accounts for work.
Google Drive provides unlimited cloud storage and seamless team access.
If you’re a WordPress user, learn how to integrate Google Workspace with your site.
Table of Contents
For Existing WordPress.com Domains
Begin by verifying your WordPress.com domain. If your website is on WordPress.com, start by verifying your domain. You can also set up your Workspace email during this step if you desire.
Skip this step if you already have Google Workspace and have been using it for over 72 hours.
Verification is crucial as it ensures the security of your account. No one else will be able to access your Google Workspace using your domain.
Now, proceed with the following steps.
Step 1
- Log in to the Google admin console with an admin account. Avoid using your current Gmail account. Click on continue for verification. Utilize a TXT record for this step. Retrieve the verification code from the setup tool and copy it. Keep this window open.
Step 2
- Open a new browser tab
- Visit the WordPress website
- Provide your domain information, username/email, and password. These should have been received upon purchasing your WordPress domain. If you don’t recall the details, you can recover the account or reset the password.
- Click on “Continue”
Setting Up an Email Account
To set up an email account, follow these steps:
1. Visit the WordPress site
2. Click on “my site” located on the top left corner of the screen
- Go to the WordPress site
- Click on my site. You will find it on the top left of the screen
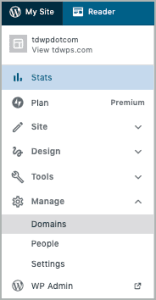
- Click on the domain name. This is for the one you need to verify
- Click on the name servers and DNS button
- Click on G-Suite.
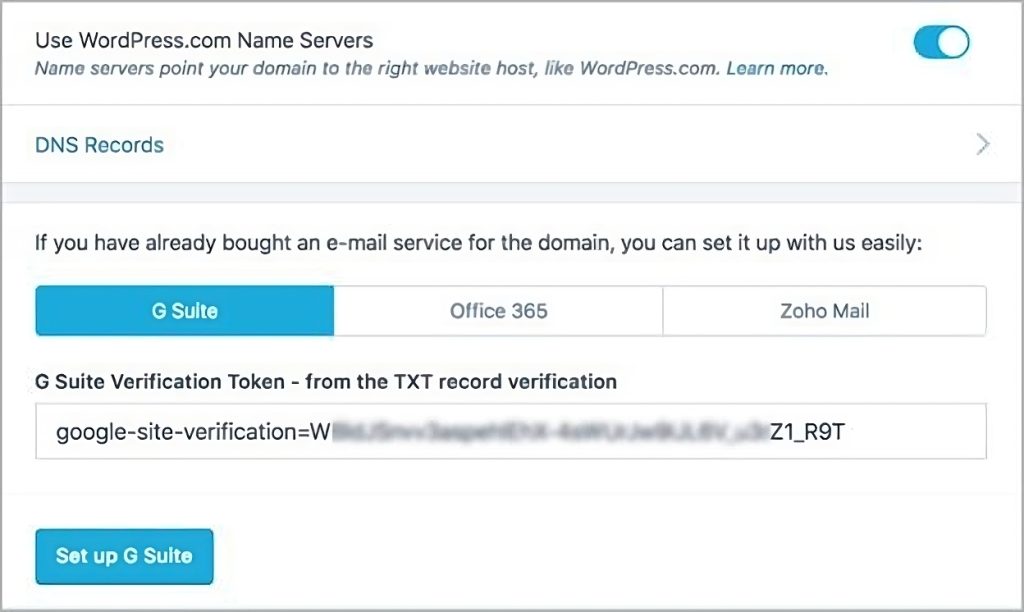
- Input the TXT you copied in step 1 above in the text field
- Now, finish by clicking on Set up G Suite
Enter the text from Step 1 into the specified field. Then, finalize the setup by selecting “Set up G Suite.”
Congratulations, the domain verification process is now finished. Your WordPress domain’s DNS records now include the Google Workspace MX records.
Google Workspace will verify the code.
Navigate to the Google admin console > sign in using the administrator accounts > proceed > verify my domain.
Results may take time. It could take up to 48 hours in certain instances, so please be patient. If you receive an error message, it indicates that your registrar is still in the process of publishing the code.
Step 3
Return to the browser in step one using the workspace setup tool.
You have two options here.
First, you can add multiple users to your account. To do this, go to (My site(s) > upgrades > domains (select the one you want) > manage your email accounts > add new users (enter the new user details) > continue. Complete the purchase and await an email with the new user’s information.
The second option is to activate the organization’s Gmail account. For instance, if you handle websites for nonprofits and have access to Google Workspace for nonprofits.
This platform aids in streamlining work processes by centralizing all resources. Remote teams can collaborate and communicate effectively, even across different time zones.
Here’s how to set up your Workspace for Nonprofits account.
Firstly, ensure that you meet the eligibility criteria for nonprofit organizations.
- Now follow these steps:
- Access the administrator account through the Google admin console.
- Set up your business email.
- Activate the nonprofit edition, which is free of charge. Keep in mind that there is a trial period during which you can switch your business account to this edition.
- Transfer user emails, contacts, and calendars to the G-suite for nonprofits. Google provides a user-friendly tool to simplify this process. You will have various migration options based on the location of the information.
Once you have set up G Suite, you can:
- Build and manage teams.
- Enhance the organization’s account with logos, relevant security, and compliance measures.
- Manage your emails, contacts, and meetings effectively.
- Utilize online documents like spreadsheets and presentations, along with access to cloud storage for data security.
- Access training guides, tips, and other resources to help the team master G Suite.
- Find valuable resources in the help community, where experts can answer any questions you may have.
For New WordPress Domains
If you are in the process of registering a new domain, follow the steps below.
Step 1. Go to My site > Upgrades > domains (add your domain here)
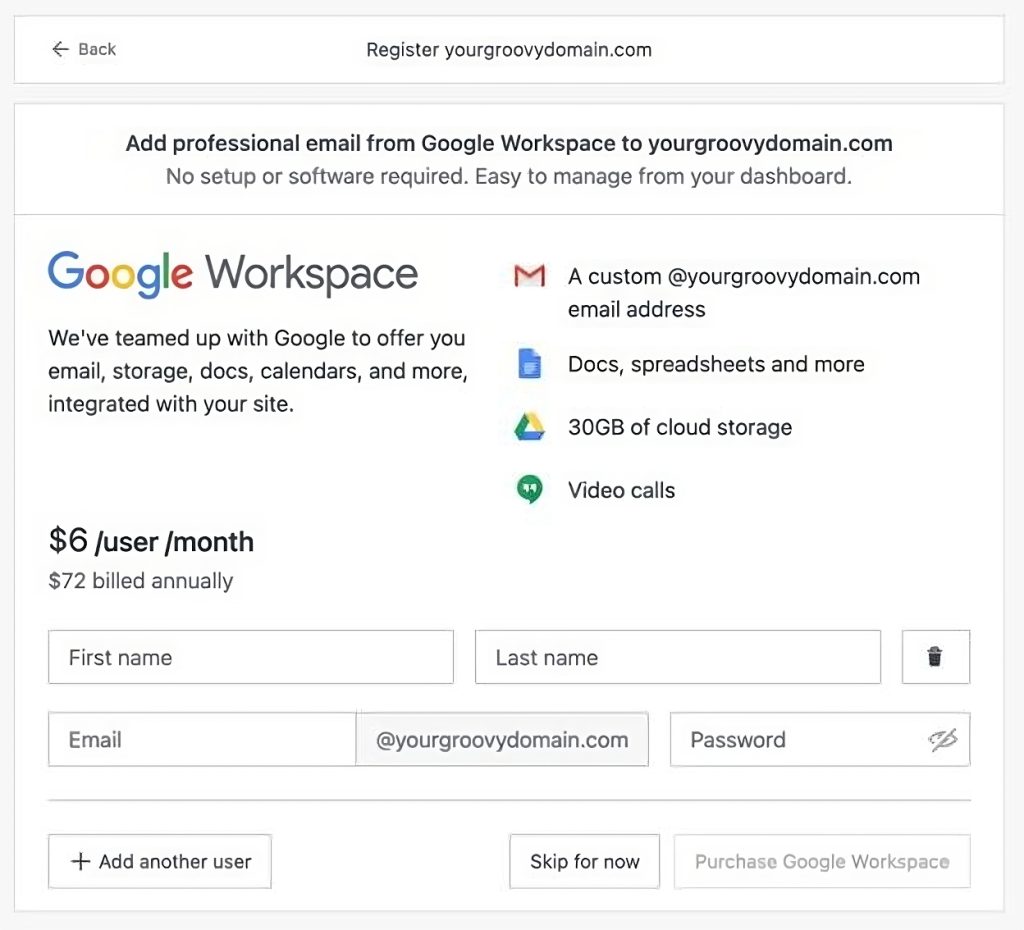
Step 2. Select the option to add Google Workspace to the domain. Input the relevant details, including the owner, email address, and password
Step 3. You can add other users if you want extra licenses. Do note; that an additional license will incur a cost calculated at the time remaining until renewal.
If not, proceed to purchase Google Workspace and complete the checkout process.
Step 4. Return to step 1 to complete the setup. You should have your Workspace password ready or utilize the temporary one provided by Google. If you opt for the latter, ensure to replace it as soon as possible.
You may receive an email asking you to agree to the Google Terms of Service. Please accept the terms to start using the workspace.
Step 4. Return to step 1 to complete the setup. You should have your Workspace password ready or utilize the temporary one provided by Google. If you opt for the latter, ensure to replace it as soon as possible.

You may receive an email asking you to agree to the Google Terms of Service. Please accept the terms to start using the workspace.


